Introduction
Use File Property Edit, With just several clicks, you can easily change the files' attributes, including "create time", "modify time", "last access time", "read-only", "hidden", "system"... and modify their properties, such as document summary properties, photo's EXIF properties, and MP3 ID3 Tags (V1 and V2). With the powerful file and folder browse feature and the drag and drop support, you can add a group of files and directories. The 1-click Undo feature allows you to rollback all the changes you just made. It also supports quick preview feature, which allows you to see the picture's thumbnail while you edit it, and the export properties feature, which allows you to export the file properties into XML file or CSV file.

Main features
- Modify all types of photo's properties including EXIF.
- Modify MP3 ID3 Tags including V1 and V2.
- Modify file and folder's "created date time", "modified date time", and "Last access date time".
- Modify file and folder's attributes including "Archive", "Read Only", "Hidden", "System", "Temporary", "Offline", "Content index", or "Normal".
- Modify file's document summary properties including: "Title", "Subject", "Author", "Keywords", "Comments", "Template", "Last Author", "Revision Number", and "App Name".
- Modify Document summary properties on Vista and Windows 7, for both 32 bit and 64 bit system.
- QuickView feature - preview thumbnail of photo, and shell details info for all files.
- Use variables to change file and folder's date time attributes.
- Export properties feature, support exporting file properties into XML or CSV file.
- Variables supported in file property, you can add current date time, number series, datetime series ... in string file property fields, or increase/decrease the property value in number and datetime fields.
- Drag and Drop support, it's easy to add files to the list, just drag files from anywhere and drop them to File Property Edit's list.
- Undo feature: after changing the properties of files and folders, you can use this to cancel the changes, and rollback to the old property values.
- Files filter feature support case sensitive and exclusive filtering - you can easily filter in or out the files you want from the file list.
How to add files or folders to the list
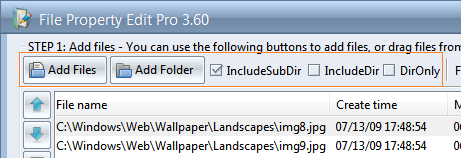
Using the "Add Files" or "Add Folder" button, you can add files and folders to the list. Also, you can drag and drop to add files to the list from anywhere on your computer.
"Add Files" button
To open the Open File dialog, in which you can select file(s) and add them to
the file list.
"Add Folder" button
To open the browse dialog, in which you can select a folder to add all files in that folder to the file list.
If "IncludeSubDir" is checked, all the files in the sub directories will also be added to the list.
If "IncludeDir" is checked, folders will also be added to the list, so that you can change the properties of the folders.
If "DirOnly" is checked, then only the folders, not the files in it, will be added to the list.
How to control the items in the file list
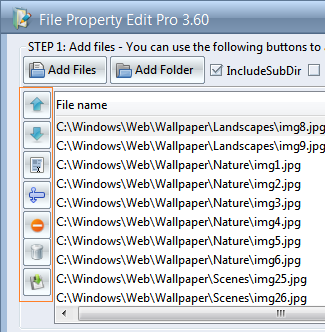
From top to bottom, the 1st button: Move the selected file or folder up, so that it will be processed earlier.
2nd button: Move the selected file or folder down, so that it will be processed later.
3rd button: Select all the files and folders in the list.
4th button: Invert the selection in the file list.
5th button: Remove the currently selected file from the file list.
6th button: Empty the file list.
Use files filter

Typing the keyword in
this edit box, the files that do not match this filter will be filtered out. For
example: if you type "net", the files which name do not include "net"
will be filtered out from the file list. You may use asterisk in the filter like
"*.bmp", that means list files with an extension name of "bmp".
By checking the checkbox
"Case sensitive ", the files do not match the case in the list will be filtered out.
By checking the checkbox "Exclude filter ", the filenames which do match the keyword will be filtered out.
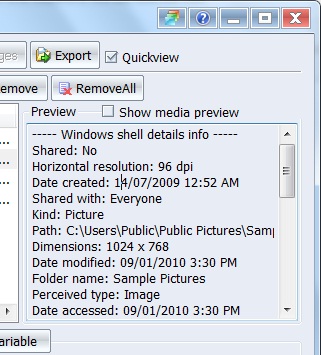
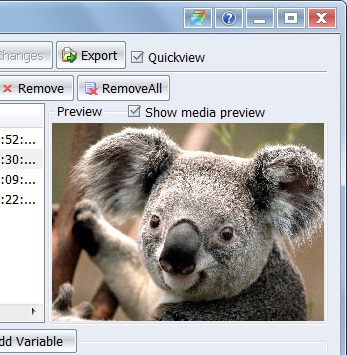
Quickview
By selecting the "Quickview" checkbox, the quick view box will open, by default it will display the shell details information of the selected file on the file list. If a picture file is selected, you can also select the "show media preview" checkbox, then the picture will be displayed in the preview box.
How to change file date time properties

After select a file in the file list, please select the "File date time" category in the list box on the left, then all the file time properties are listed in the next listbox, and related controls are enabled. Select the file date time item in the list, you will see the value displayed on the right, and then, you can use the controls to modify the date time value. You can select multiple date time properties from the list, and modify them together.

Using the command combobox on the top, you can spevify how you'd like to set the date time property value, options are:
- "Do not change", by default, this option will be selected, then the selected file time property will not be changed.
- "Use value from date time picker", select this option, the date time picker controls on the right will be enabled, then you can set a date time value in the picker controls, the selected file time property will be set using this date time value.
- "TimeSeries", select this option, it will change the selected time property follow a time series pattern. After select this option, a template time series variable will be auto added in the combobox as: <%TimeSeries start from:2011:07:23 14:57:03; step:+1:01:00:00%> . You can customize this value to meet your request, the value after the "step" is formatted as: + or - (increase or decrease) days:hours(HH):minutes(MM):seconds(SS). For example, it you have 3 files added in the file list, when you click the "Apply changes" button, the date time property will be be changed as:
file1 - 2011:07:23 14:57:03
file2 - 2011:07:24 15:57:03
file3 - 2011:07:25 16:57:03
- "TimeAdjust", select this option to make a specific change to the datetime property of each file in the file list. After select this variable, a template time adjust variable will be auto added in the combobox as: <%TimeAdjust +1:01:00:00%>, the datetime value is formatted as "+ or - (increase or decrease) days:hours(HH):minutes(MM):seconds(SS)". You can customize this value to build a different value adjustment. For example, if you want to add 2 hour 3 minutes and 4 seconds to each file's datetime attribute, you can change the variable as "<%TimeAdjust +0:02:03:04%>".
- "Use file create time", select this option, it will use the file create time property to set the selected property, for example, you may want to set file last accessed time same as the file create time.
- "Use file modify time", select this option, it will use the file modify time property to set the selected property.
- "Use file last access time", select this option, it will use the Use file last access time property to set the selected property.
After finish editing the property values, press the "Apply Changes" button at the bottom, then the new property values will be set to the all the files on the list.
How to change file attributes
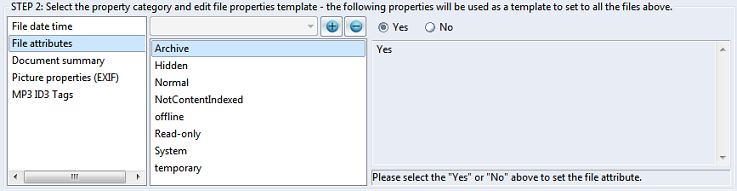
After select a file in the file list, please select the "File attributes" category in the list box on the left, then all the file attributes are listed in the next listbox, and related controls are enabled. Select the file attribute in the list, you will see the value displayed on the right, and then, you can use the controls to change the file attribute. You can select multiple file attributes from the list, and modify them together. After set the atttributes, press "Apply Changes" button to set the new attributes to all the files and folders listed.
Note: when you set "Normal" attribute to be "yes", then all other file attributes will be set as "no", because this attribte is exclusive.
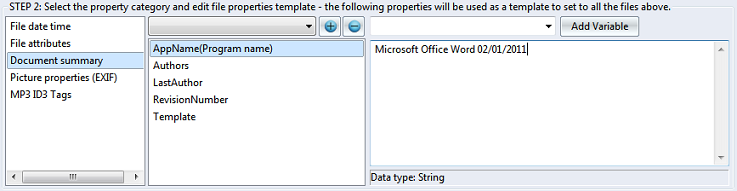
How to change Document summary properties
After select a file in the file list, please select the "Document summary" category in the list box on the left, then the file properties of the selected file will be listed in the next listbox. By selecting the different property name item on this list, the corresponding property value will be shown on the right edit box. Then, you can modify the property value in the edit box on the right.
NOTE: The property values listed there will be used as a template to change all the files and folders in the file list. Here's how it works:
- For a property in the list but not exist in a file, then the property will be added to the file.
- For a property in the list and also exist in a file, then the property value will be updated in the file.
- For a property not in the list but exist in a file, then the property will not be changed in the file.
For example: if you do not want to change some of the property values, you can remove it from this list by pressing the "remove" button., then when you apply the changes, only the listed property values will be changed in the files.
Hint: hold control key to select multi items from the list. You can use the "Variable" to change the property values, please click here to see the details.
The data type of document summary are "string", you can directly enter the value in the edit box to change the value.
After finish editing the property values, please press the "Apply Changes" button to set the new property values to all the files in the list.
How to edit picture's properties (EXIF)
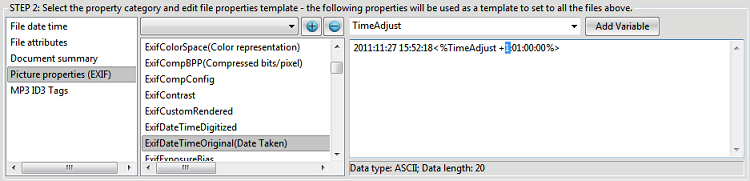
After adding pictures to the file list and select it, please select the "Picture properties (EXIF)" category in the list box, then all the picture properties of the selected file will be listed on the property list box. By selecting the different property name item in the property list, the corresponding property value will be displayed in the edit box on the right. After that, you can edit the property value in the edit box.
If you do not want to change some of the property items, you can remove it from this list by click the "Remove" button .
If you want to add some new EXIF property to the file, just select the property from the combo box above and click the "add" button to add the property, then you can enter the value in the edit box.
NOTE: The property values listed there will be used as a template to change all the files and folders in the file list. Here's how it works:
- For a property in the list but not exist in a file, then the property will be added to the file.
- For a property in the list and also exist in a file, then the property value will be updated in the file.
- For a property not in the list but exist in a file, then the property will not be changed in the file.
Hint: hold control key to select multi items from the list. You can use the "Variable" to change the property values, please click here to see the details.
If the data type of the EXIF property is "string" or number, you can directly enter the value in the edit box to change the value.
If the data type is bytes, the edit box will display the binary value of the property, and the readable value will be displayed in the box below it.
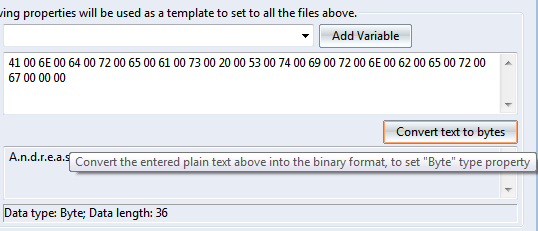
To edit this type of data, you can enter the text value in the edit box and then click the "Convert text to bytes" button, then it will translate the text into the correct binary data in the edit box, after that, it's ready to be set to the files.
After finish editing the property values, please press the "Apply Changes" button to set the new property values to all the files in the list.
How to edit MP3 file's ID3 tags
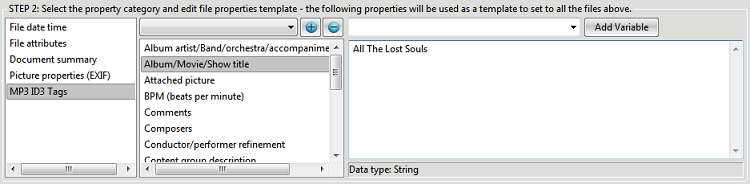
After adding mp3 files to the file list and select it, please select the "MP3 ID3 Tags" category in the list box, then all the MP3 properties of the selected file will be listed on the property list box. By selecting the different property name item in the property list, the corresponding property value will be displayed in the edit box on the right. After that, you can edit the property value in the edit box.
If you do not want to change some of the property items, you can remove it from this list by click the "Remove" button .
If you want to add some new property to the file, just select the property from the combo box above and click the "add" button to add the property, then you can enter the value in the edit box.
NOTE: The property values listed there will be used as a template to change all the files and folders in the file list. Here's how it works:
- For a property in the list but not exist in a file, then the property will be added to the file.
- For a property in the list and also exist in a file, then the property value will be updated in the file.
- For a property not in the list but exist in a file, then the property will not be changed in the file.
Hint: hold control key to select multi items from the list. You can use the "Variable" to change the property values, please click here to see the details.
The data type of MP3 tags are string or number, you can directly enter the value in the edit box to change the value.
After finish editing the property values, please press the "Apply Changes" button to set the new property values to all the files in the list.
Use variables to modify file properties:
From this variable combobox, you can select to add variable to the property edit box, then File Property Edit will use that variable to generate dynamic value and set it to the file.
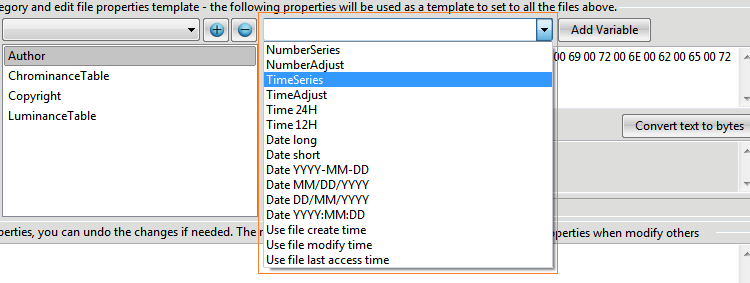
Here're the available variables:
1. Current Date
“Date DD/MM/YYYY” – current date will be added to the selected property field, formatted as 31/01/2010.
“Date MM/DD/YYYY” – current date will be added to the selected property field, formatted as 01/31/2010.
“Date YYYY-MM-DD” – current date will be added to the selected property field, formatted as 2010-01-31.
“Date long” – current date will be added to the selected property field, formatted as Wednesday, February 03, 2010, using local full date time format.
“Date short” – current date will be added to the selected property field, formatted as 02/03/10, using local short date time format.
2. Current Time
“Time 12H” – current time will be added to the selected property field, in 12 hour format, like 03:49:05 PM.
“Time 24H” – current time will be added to the selected property field, in 12 hour format, like 15:49:18.
3. Date time series
“TimeSeries” – select this item and add it, there will be a variable “<%TimeSeries start from:2010:02:03 16:10:01; step:+1:01:00:00%>” added to the property edit area, by default, it will generate a date time series start from “2010:02:03 16:10:01”, and increase 1 day, 1 hour on each file in the file list.
For example: if you add this variable to the Document Summary_Comment field, then the result will be:
1st file’s comment: 2010:02:03 16:10:01
2nd files’ comment: 2010:02:04 17:10:01
3rd files’ comment: 2010:02:05 18:10:01
…
You can also change the value in the variable directly in the property edit to customize your date time series, e.g. you can change the variable to be “<%TimeSeries start from:2008:01:01 12:00:01; step:+0:00:01:00%>” – means on each file, it will increase by 1 minute, start from January 1st 2008, time: 12:00:01.
Or you can make the series decreasing on each file: “<%TimeSeries start from:2008:01:01 12:00:01; step:-1:00:00:00%>” –means on each file, it will decrease by 1 day, start from January 1st 2008, time: 12:00:01.
4. Number series
“NumberSeries” – select this item and add it, there will be a variable “<%NumberSeries start from:1; step:+1%>” added to the property edit area, by default, it will generate a number series start from 1, and increase by 1 on each file in the file list.
For example: if you add this variable to the Document Summary_Comment field, then the result will be:
1st file’s comment: 1
2nd files’ comment: 2
3rd files’ comment: 3
…
You can also change the value in the variable directly in the property edit to customize your number series, e.g. you can change the variable to be “<%NumberSeries start from:100; step:+10%>” – means on each file, it will increase by 10, start from 100.
Or you can make the series decreasing on each file: “<%NumberSeries start from:1000; step:-1%>” – means on each file, it will decrease by 1, start from 1000.
5. Adjust the existing date time value
"TimeAdjust" - select this item and add it, there will be a variable “<%TimeAdjust +1:01:00:00%>” added to the property edit area, by default, it will increase the existing date time value by 1 day and 1 hour. You can also change the value in the variable directly in the property edit to customize the date time adjust value, e.g. you can change the variable to be “<%TimeAdjust -2:02:02:00%>” – means decrease the date time value by 2 days 2 hours and 2 minutes.
6. Adjust the existing number value
"NumberAdjust" - select this item and add it, there will be a variable “<%NumberAdjust +1%>” added to the property edit area, by default, it will increase the existing number value by 1. You can also change the value in the variable directly in the property edit to customize the number adjust value, e.g. you can change the variable to be “<%NumberAdjust -5%>” – means decrease the number value by 5.
Start changing the files' properties
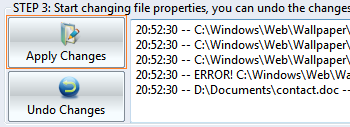
After all property values are set, click this "Apply Changes" button to write all the values into the files.

After click this button, the process will start, and a progress bar will show on the right showing the whole progress of changes the files. And the button will be displayed as "Stop processing", you can click this button again to stop the property changing process.
How to undo the changes
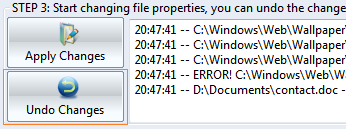
After you click the "Apply Changes" button to change the files' properties, this "Undo Changes" button will be enabled. Then if you do not want to keep the new changes, and want to restore the old values, you just need to click this "undo" button, all the changes will be rolled back.
Check the result of the operations
All the result of changing the file properties will be displayed in this result box on the bottom. It will tell you if the file is changed successfully or not, and if not, it will tell you the reason. For example, the "access denied" error, which probably caused by a file is still opened by other program, so we can't change it on the same time, or in Vista/Win7, it's a system protected file, you may want to run File Property Edit as administrator user to change its file properties.

How to export file properties
Click the export button, you can export the selected file properties to a XML or CSV file.
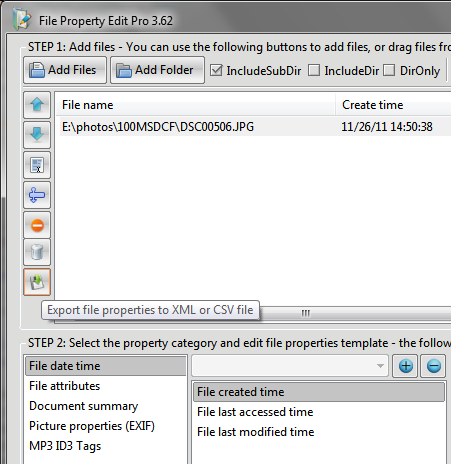
After adding the files, please select the property category from "File date time", "File attributes", Document summary", "EXIF", or "MP3 ID3 tags", then click the "Export" button, the following dialog will show up:
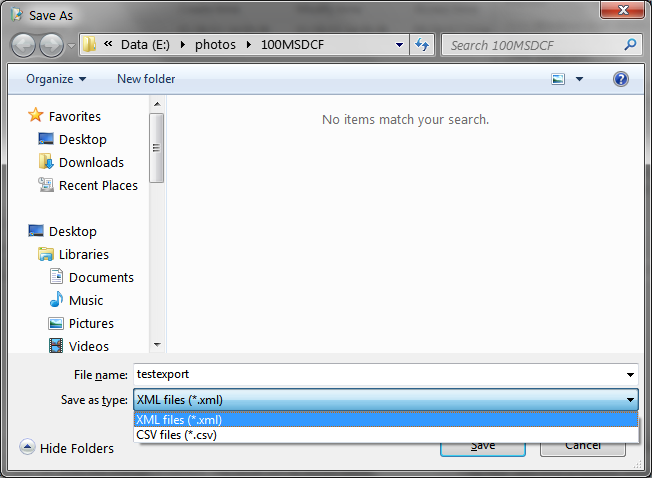
You can select to export the file properties to a XML or a CSV (EXCEL) file. Click "Save" button, the file will be generated, and the selected file properties will be exported to the file.
How to activate this product online and unlock the full features
(If you haven't purchased this product yet, please purchase it at http://www.foryoursoft.com/buy.htm, this activation service is only provided for paid users)
1. Please click the "Activate" button (with the icon of keys) on the title bar to show the Activation dialog.

2. Then, please fill in your name, email and most importantly the Order ID (which has been sent to you by email after you complete the online order), and click the "Activate Online" button at bottom to unlock the full version.

Online update

Click the help menu button on the title bar to show the help menu as follow:
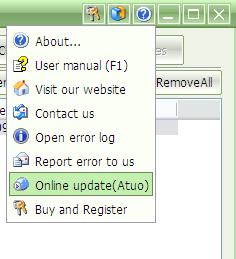
Then click on the "Online update" menu item to check for new version online. It will contact our server to get the latest version and prompt you whether to upgrade to the latest version if available. When there's a "(Auto)" tag at the end of this item, it means "File Property Edit" will automatically check for new version every time when it starts. Click this item again will toggle it to not auto check for new version.
Error log and report
All the errors occurred during your use of "File Property Edit" will be logged in a file. Here's how to view it and report it to us.
Click the help menu button on the title bar to show the help menu as follow:
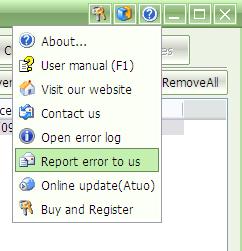
Then, click the "Report error to us" item to send us the error report by email. We will analyze the error report and try to find out the solution for you. You can also view the error log by clicking the "Open error log" item.
Technical support
If you have any questions, comments, or suggestions on our product, please feel free to use our online support system at: http://www.foryoursoft.com/support.htm
Thank you!