Introduction
BatchRename (pro) - help you easily rename a bunch of files and folders within just a few clicks. You can define all kinds of renaming rules, especially, rename MP3 files with ID3 Tags and rename photos using EXIF data. Also, you can use BatchRename to batch convert and adjust your photos.

Main features
- Support Encrypt/Decrypt file name using RC4, Base64 and MD5 algorithm.

- Support EXIF data - rename digital camera pictures with the EXIF data information: Camera name, Digitized date, Original date time, ISO speed, Exposure time, Shutter speed, Lens aperture, F-Number, GPS data. All EXIF properties supported now!
- Support renaming files using their Shell detail properties* - you can use what you see on the columns of Windows explorer (including video properties, audio properties ...) to rename the files.
- Support for MP3 Tag ID3 v1 and v2, rename by music's Title, Album, Artist, Genre, BitRate, Frequency, SubTitle, Language, Comment, Copyright, Composer and etc,... All MP3 ID3 tags supported now!
- Support rename picture files
by their Image properties: resolution, color bits, type format.
- Support Rename files by the local date time format, or file's date time attribute.
- Insert specific length of digits ascending or descending to file or folder names. Also support add random numbers now.
- Uppercase/lowercase the first letter of each word, and Uppercase/Lowercase/Remove any specific character in the filenames.
- Support store the renamed files to a different folder by specifying destination output directory.
- Support truncate
filename to a specific length.
- Favorite rename rules - you
can easily save and pick up your favorite renaming rules.
Also, you may ask us to build renaming
rules for you, and download them
from foryoursoft.com to your favorite
directory. A filter for favorite renaming rules also available to group all the renaming rules.
- QuickView* - it allows you view (picture) or play (movie or music) the selected file in the "QuickView" window. So you can see the
files directly and decide how to rename them. Also, you can view all the file properties in the quickview area including: MP3 Tag info, Picture's EXIF data, and Windows shell details info. With this, you can easily decide which property you want to use to rename the file.
- Drag and Drop - It's easy to add files to the renaming list, just drag them anywhere and drop to BatchRename's files list.
- Support windows shell
context menu* - The menu item "BatchRename files..."
is added to the windows shell context menu after installation. By selecting
some files in your windows explorer, right-click the files
and select "BatchRename files" from the context menu, it will open "BatchRename" to rename
the selected files and folders.
- Picture adjustment and editing* - You can select the "PICADJUST" command to resize your photos to a specific size, and even rotate or flip them with a batch rename rule.
- Batch picture conversion*
By adding picture convert rules "PICCONVERT", you can easily convert your pictures to most popular format (bmp, jpg, gif, tiff, png) and support JPEG quality control.
- Preview Renaming - when you set up the FileList and the RuleList, you
may want to preview the result to see whether it meet your
requirements before you decide to really rename them.
- Undo Renaming - After you rename the files, this function allows you to cancel
the changes, and restore the old filenames.
- Load/Save Batch - The Filelist,
RuleList and the result list even the Undo state can be
saved to a file, so you can reuse the rules, review the
file list or restore the old filenames by load the batch
you saved.
(Features marked with * are for BatchRename Pro only).
How to add files and folders to the file list
Using the "Add Files"  or "Add Folder"
  button, you can add files and folders to the file list.
Also, to add files to the list, you can drag any files from anywhere on your computer and drop them on the file list, then the files will be listed on file list.
You can add files from different folders to the file list and rename them all together in a batch, there's no limitation on this.
To open the Open File dialog, in which you can select file(s) and add them to
the file list.
To open the Browse dialog, in which you can select a folder to add all files in
that folder to the file list.

If "SubDir" checkbox is checked, all the
files in the sub directories will also be added to the list.
If "IncludeDir" checkbox is checked, the folder itself will also be added to the list.
 To re-order all the files in the file list by the file name.
 To move the selected file one step up on the file list.
 To move the selected file one step down on the file list.
 Select all the files and folders in the list.
 Invert the selection in the file list.
 Remove the currently selected file from the file list.
 Remove all the files from the file list.
 To open a Browse dialog, choose or input a dir to copy the selected files to that dir. If the dir you entered does not exists, it will be created.
 To open a Browse dialog, choose or input a dir to move the selected files to that dir. If the dir you entered does not exist, it will be created.
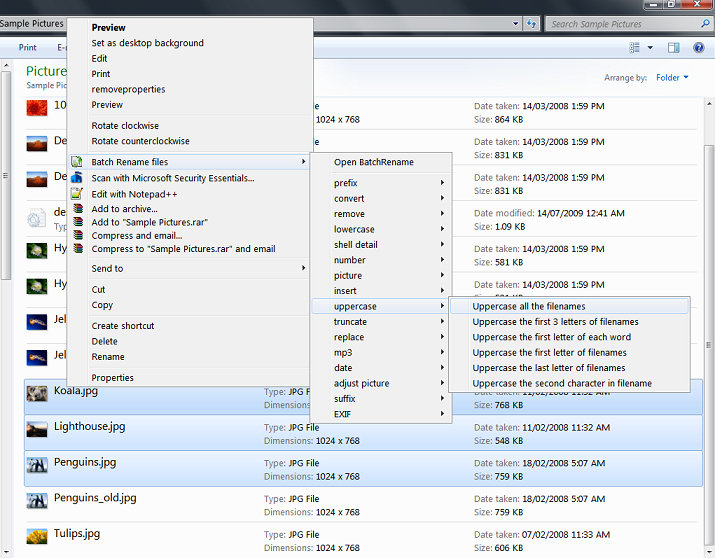
How to use BatchRename's windows shell context menu*
After you installed BatchRename Pro, a new shell menu item "BatchRename files" will be added to the Windows shell context menu. After selecting some files in your windows explorer, right-click on the files and select "BatchRename files", then BatchRename Pro will open and the files you just selected will be added on the file list and ready for renaming.
You can also switch on/off this shell menu feature using the "ShellMenu" checkbox on top of BatchRename window.
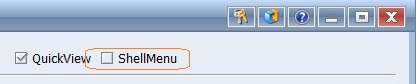
(*This feature is available in BacthRename Pro only)
How to use the File Filter

Typing some characters in this edit box, the files that do not contain those characters will be filtered out. For example: if you type "net", the files which name do not include "net" will be filtered out from the FileList. You can also use * as wildcard character in the filter, for example: "*.jpg", means only list files with an extension name of "jpg".
By checking the checkbox "Case", the files filter will be case sensitive.
By checking the checkbox "Exclude", the filenames which do match the filter will be filtered out.
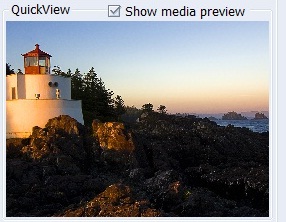
Quickview
By selecting the "Quickview" checkbox, the quickview preview box will open, if a picture file or media file is selected on the file list, the content preview will be displayed in the preview box.
QuickView function allows you to view or play the selected file if it's one of the following types:
- Pictures files: .bmp; .jpg; .gif; .tiff, .png.
- Audio/Video files: .cda; .ivf; .aif; .aifc; .aiff; .asf; .asx; .wax; .wm; .wma; .wmd; .wmv; .wvx; .wmp; .wmx; .avi; .wav; .mpeg; .mpg; .m1v; .mp2; .mpa; .mpe; .mp2v; .mpv2; .mid; .midi; .rmi; .au; .snd; .mp3; .m3u; .vob;
- Flash files: .swf. (*Flash player needed.)
- Real media files supported in the QuickView. (*Realplayer needed)
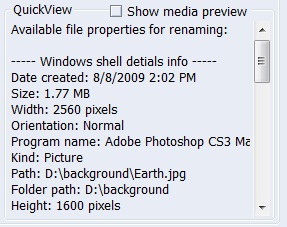
In this QuickView window, you can also view the file's detail properties which could be used to rename the file, including Windows shell details info, EXIF data (if it's a digital camera generated photo), image property (if it's a picture file), and MP3 ID3 Tag info (if it's a MP3 file):

Renaming rules and renaming commands
In BatchRename, each item listed on the favorite renaming rules list is a renaming rule, you can also use use the renaming rules builder to build a renaming rule and save it to the favorite renaming rules list. Each item listed on the renaming rules builder is a renaming command, you can create a renaming command using the command combo boxes in renaming rules builder. A renaming rule may contain one or more renaming commands, it cab be use to:
- Rename file's name or extension or folder's name.
- Convert a picture file into another picture format.
- Adjust a picture's size, and other properties.
- Specify an output folder for the renamed files.
How to start renaming files and folders
The easiest way to rename files is to select a pre-defined renaming rule from the favorite renaming rule list, do some modifications if needed using the renaming rule builder, then start preview and batch renaming.
If none of the favorite rules meet your request, you can use the renaming rule builder to build your own renaming rule and use it to rename files.
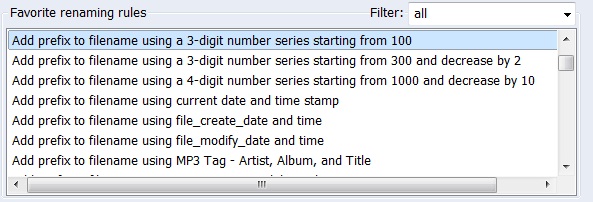
How to use favorite renaming rules list
There are lots of pre-defined renaming rules presented there in the favorite list after installation. They covered most of the popular renaming requests.
You can easily pick up one or multiple renaming rules. Also, you may download renaming rules from our web site to your favorite directory.
By selecting a renaming rule from the favorite list, the renaming commands will be displayed on the "Renaming rules builder", each renaming rule on the favorite list may contain multiple renaming commands.
If the renaming rule selected from the favorite list is exactly what you want, you can start preview and rename now. If not, you can use the renaming rule builder to modify it, please go to next section to learn about how to use renaming rule builder.
You can also select multiple renaming rules from the favorite list, then the renaming commands will be combined together and added to the renaming rule builder:
For example: select two rules from favorite list:
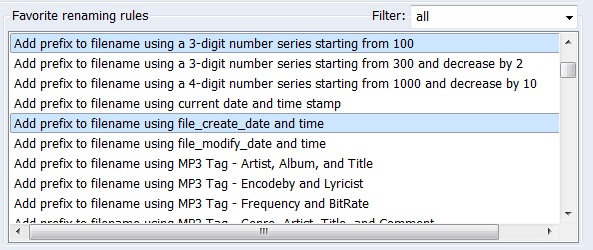
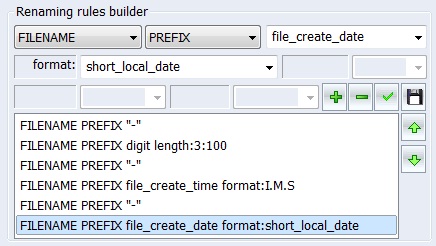
Then the renaming commands from the two selected renaming rules will be listed in rules builder:
How to use renaming rules filter to find the renaming rule that I want from the favorite renaming rule list
You can use the filter combo box in favorite renaming rules lit to filter different type of renaming rules in the list. By default, "all" will be selected on the filter, so all renaming rules will be listed there. You can choose from the predefined filters in the combo box to only show that type of renaming rules, like EXIF, MP3, prefix, replace ...
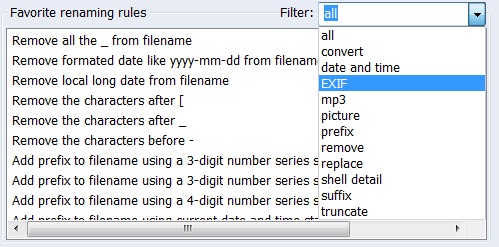
For example, you only want to see the renaming rules which will use windows shell details data to rename files, then you just need to select "shell detail" from the combo box. Also, if the keyword that you are looking for is not listed on the filter list, you can directly type it in the combo box, for example, type "MD5" in it, then all the renaming rules which use MD5 hash code to rename files will be listed in the favorite rule list.
How to use renaming rules builder
With this rules builder, you can build all kinds of renaming rules by using the combo boxes to add different renaming commands.
Each renaming rule may contain one or multiple renaming commands, so by combining the commands together, you will get tons of different renaming rules to achieve your renaming goals.
- To add renaming commands
After you pick up the command from the combo box, press the  button to add a renaming command to the list, you can add as many command item as you want to the list to finally generate the renaming rule. You can use the
  button to save this renaming rule to the favorite folder, and then the renaming rule will be listed on the favorite list, so that you can easily reuse it later on.
Here are the options and combinations on each of the combo box:
Combo box 1 and 2:
| Combo box 1 |
Combo box 2 |
| FILENAME (change will be made to the file name) |
When select FILENAME on the first combo box, the options on combo box 2 will be:
PREFIX, SUFFIX, REMOVE, REPLACE, UPPERCASE, LOWERCASE, and INSERT |
| FILEEXT (change will be made to the file extension) |
When select FILEEXT on the first combo box, the options on combo box 2 will be:
PREFIX, SUFFIX, REMOVE, REPLACE, UPPERCASE, LOWERCASE, and INSERT |
| DESTDIR (the result files will be output into the specified folder) |
No options needed for DESTDIR, you just need to click the "+" button to complete this renaming command by choosing the destination folder, the files after renaming will be output to that folder. |
| PICCONVERT (to convert a picture into another picture format) |
The options for picture conversion in combo box 2 are: JPG, BMP, GIF, PNG, and TIFF. |
| PICADJUST |
The options for picture adjusting in combo box 2 are: Size, Rotate, and Flip. |
| ENCRYPT |
Encrypt the file name, file extension, or both of them together with RC4, Base64 or MD5 algorithm. |
| DECRYPT |
After encrypted, you can also decrypt the filenames using BatchRename. |
| FXFORMAT |
For a series of FX pictures, you can use this command to format the timecode within those file names. |
Available options in combo box 3 (when selecting FILENAME and FILEEXT on 1st combo box):
| Combo 2 |
Available renaming features |
| When selecting "PREFIX" or "SUFFIX" on combo box 2 |
the prefix or suffix can be: digit (number) series, EXIF info, shell details info, current date time, file create date time, file modify date time, file last access date time, image property, MP3 Tag, file's CRC32 code, MD5 hash, SHA1 hash, or any specific characters you typed in the combo box 3. |
| When selecting "REMOVE" on combo box 2 |
you can select to remove: all characters, the left n characters, the right n characters, the left n letters, the right n letters, the number n character from left or right, remove the formatted date from filename, remove part between specific tag like '(' and ')', remove part after a specific tag, remove part before a specific tag, remove other characters and keep the left or right n characters, work as truncate filename. |
| When selecting "REPLACE" on combo box 2 |
replace any characters by other characters or by empty, which is functioned as remove the characters. For example. to remove all spaces from filename, the command will be FILENAME REPLACE " " with "". |
| When selecting "UPPERCASE" or "LOWERCASE" on combo box 2 |
you can select to uppercase or lowercase: all characters, the number n character count from left or right, the number n letter count from left or right, the first letter for each word in the filename, the first n characters, the last n characters, the first n letters, the last n letters. |
| When selecting "INSERT" on combo box 2 |
you can insert the following values into a specific position of the filename:digit (number) series, EXIF info, shell details info, current date time, file create date time, file modify date time, file last access date time, image property, MP3 Tag, file's CRC32 code, MD5 hash, SHA1 hash, or any specific characters you typed in the combo box 3. |
- To modify and update a existing renaming command
By select each item on the list, the renaming commands will be displayed correspondingly on the command build combo boxes. you can use  button to remove an item from the rule builder list, and use
  button to update the selected item from the command combo box.
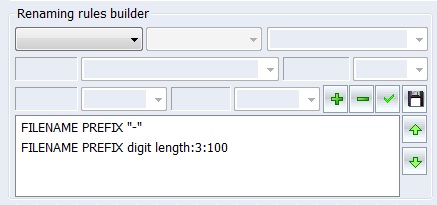
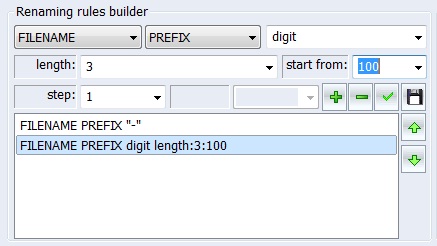
For example: when selecting "FILENAME PREFIX digit length:3:100 on the list, combo box 1 will be changed to "FILENAME", combo box will be "PREFIX", combo box 3 will be "digit", combo box 4 will contain the length value "3", combo box 5 will contain the start from value "100".
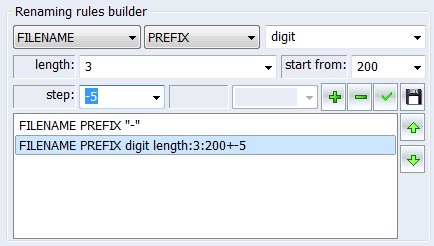
If you want to change this renaming command to be a number series start from 200 and decrease by 5, then you just need to change the value in combo box 5 to be 200 and value in combo box 6 to be -5, and then click the button to update the current selected renaming command item in the rule builder list. After that the current selected renaming command item will be changed to be "FILENAME PREFIX digit length:3:200+-5", it will create a number series starting from 200 decrease by 5.
- To adjust the execute order of the renaming commands
The order of the renaming commands in the list matters when renaming files, commands will be executed from the top of the list to the end. Using the example above, command "FILENAME PREFIX '-'" will be executed first, then the second one. You can use the two arrow buttons and to adjust the order of the renaming commands on the list.
Add number series to file names
You can add a number series to filename and specifying how many digits in the number series, start from a specific number, and set an increasing or decreasing step for the series.
For example: to add a 3 digit number series prefix start from 100, and step increasing by 2, you just need to select "FILENAME" on combo box 1, select "PREFIX" on combo box 2, select "digit" on combo box 3, and type 3 on the 4th combo box, type 100 on the 5th combo box, add this renaming command by clicking the "+" button, then use this renaming rule, the files will be renamed as "filename100", "filename102", "filename104"...
Another example, if you want to add a 6 digit number prefix increasing by 3, different from the steps above, you just need to change the value in combo box 4 to be 6, and type 3 in the 6th combo box. The files will be renamed as "filename000103", "filename000106", "filename000109" ...
It also support to add a random number into filename, e.g. to add a 5 digit random number prefix to file names, please input "5[RAND]" in the 4th combo box to specify the length is 5 digit and it's randomized number, so the "start from" value on the 5th combo box and the "step" value on the 6th combo box won't be needed.
Use photo's EXIF info to rename files
BatchRename supports renaming digital camera photos using the embedded EXIF data information including: Camera name, Digitized date, Original date time, ISO speed, Exposure time, Shutter speed, Lens aperture, F-Number .... all popular EXIF Tags are supported.
When select "exif_data" on the 3rd combo box, all the EXIF properties will be listed the 4th combo box:
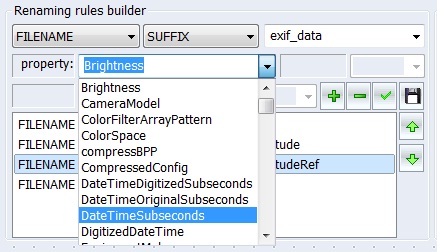
You can select any of them to generate the renaming command. Also, you can easily view the pre-defined EXIF related renaming rules from the favorite rules list by selecting "EXIF" on the favorite filter.
Use MP3 file's ID3 Tag to rename files
BatchRename supports renaming MP3 files using the file's MP3 ID3 Tag info, both ID3 v1 and v2 Tag are supported, including: Title, Album, Artist, Genre, BitRate, Frequency, SubTitle, Language, Comment, Copyright, Composer ...
When select "mp3tagv1" on the 3rd combo box, all the MP3 ID3 v1 Tags will be listed the 4th combo box:

When select "mp3tagv1" on the 3rd combo box, all the MP3 ID3 v1 Tags will be listed the 4th combo box:
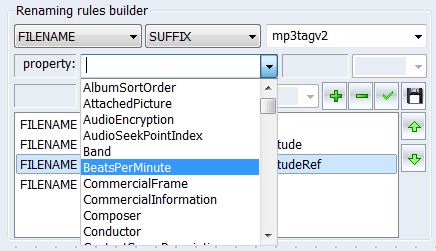
You can select any of those tags to generate the renaming command. Also, you can easily view the pre-defined MP3 related renaming rules from the favorite rules list by selecting "mp3" on the favorite filter.
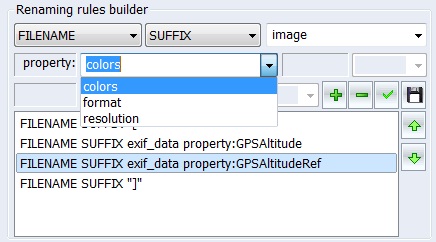
Use picture file's image properties to rename files
BatchRename supports renaming picture files (BMP,JPG,GIF,TIFF,....) using their image properties, including: resolution, color bits, type format.
When select "image" on the 3rd combo box, the image properties will be listed the 4th combo box:
Use current date and time or file's date time attributes to rename files.
With BatchRename, you can rename files using the current date, time, the file's create date time, modify date time, and last access date time, in any date time format, to renaming files.
For example: you can add the current date in "yyyy-mm-dd" format as a prefix to filenames, you just need to select "FILENAME" on 1st combo box of rule builder, and "PREFIX" on the 2nd combo box, "date" on the 3rd, then choose "yyyy-mm-dd" on the 4th combo box.
Another example: if you want to append the file's modify date in long local date format to the filenames, you can select "FILENAME" on 1st combo box, and "SUFFIX" on the 2nd combo box, "file_modify_date" on the 3rd, then choose "long_local_date" on the 4th combo box.
Use the file's CRC32 code, MD5 hash code, or SHA1 hash code to rename files.
As hash code are popular today, with BatchRename, you can use the CRC32 code, MD5 hash code, and SHA1 hash code which are calculated from the file itself to change the file's name.
For example: to add the file's MD5 hash code to the end of its file name, you just need to select "FILENAME" on 1st combo box of rule builder, and "SUFFIX" on the 2nd combo box, and "file_md5_hash" on the 3rd combo box, click "+" to add this renaming command to the list and start renaming, then BatchRename will calculate the file's MD5 hash code and append it to the file name.
Remove, truncate, and replace
Using the renaming command "REMOVE" and "REPLACE" in the renaming rule builder, you can build different type of renaming rules to remove, truncate, or replace some part in the file names:
- Remove all characters
- Remove the left/right n characters
- Remove the left/right n letters
For example, to remove the first three letters, after select "FILENAME", "REMOVE", and "left" in the first 3 combo boxes, you just need to input "3letter" in the 4th combo box.
- Remove the number n character count from left or right.
For example: to remove the 4th character in the filenames, after select "FILENAME", "REMOVE", and "left" in the first 3 combo boxes, you just need to input "#4" in the 4th combo box.
- Remove the formatted date from filename, after select "FILENAME", "REMOVE", and "date" in the first 3 combo boxes, you can select all types of date format in the 4th combo box.
- Remove the part between specific tag like '(' and ')'
For example: to remove "(1)","(2)"..."(10)"..."(100)"... in filenames, you just need to select the format "(*)" from the 3rd combo box, then all characters within the round blanket will be removed from the filename.
You can also input different pattern format like "[*]" or "{*}" in the 3rd combo box to create different renaming command, it's very flexible. The "*" here works as the asterisk wildcard.
- Remove the part after or before a specific tag.
For example: to remove all the characters after "_", similar as previous example, just need to input "_*" in the 3rd combo box.
- Truncate filename to a specific length count from left or right, same as remove other characters and keep the left or right n characters.
For example, to truncate filenames to be 8 characters count from left,
you just need to select "FILENAME" in combo box 1, "REMOVE" in combo box 2, "left" in combo box 3, and input "=8" (an "=" sign before the length value means the length is be exactly 8) in the 3rd combo box, then click the "+" button to add this renaming command to the list, and it's ready to rename.
- Use "REPLACE" in the 2nd combo box to replace any characters by other characters or replace characters by empty, which is functioned same as remove the characters. For example. to remove all spaces from filename, you just need to select "FILENAME" in combo box 1, "REPLACE" in combo box 2, and input a space in combo box 3, and keep empty in combo box 4, then click the "+" button to add this renaming command to the list, and it's ready to rename.
Uppercase and Lowercase
Using the renaming command "UPPERCASE" and "LOWERCASE" in the renaming rule builder, you can build the following different kinds of renaming rules:
the first n letters, the last n letters.
- To uppercase or lowercase all the letters in file name.
- To uppercase or lowercase the number n character count from left or right.
For example: to uppercase the 4th character in the filenames, after select "FILENAME", "UPPERCASE", and "left" in the first 3 combo boxes, you just need to input "#4" in the 4th combo box and click the "+" button to add the renaming command to the list, then you can start renaming, if the 4th character in the file name is a letter, it will be uppercased, if not, it will not be changed. e.g. "001my file.txt" will be changed to "001My file.txt".
- To uppercase or lowercase the number n letter count from left or right.
For example: to uppercase the 4th letter in the filenames, after select "FILENAME", "UPPERCASE", and "left" in the first 3 combo boxes, you just need to input "#4letter" in the 4th combo box and click the "+" button to add the renaming command to the list, then you can start renaming, and the 4th letter in the file name will be uppercased. e.g. "001my file.txt" will be changed to "001my fIle.txt".
- To uppercase or lowercase a specific length of characters of the filename count from left or from right. For example: to uppercase the first 3 characters, select "left" in the 3rd combo box and input "3" in the 4th combo box. If the character is not letter, then the won't be changed.
- To uppercase or lowercase the left or right specific length of letters by add "letter" after the length in the 4th combo box, then other non letter characters will be skipped.
For example, to uppercase the first three letter, just input "3letter" in the last combo box, file like "123__filename" will be renamed as "123__FILename".
- To uppercase or lowercase the first letter of each word in the filename.
For example: if you want to uppercase the first letter of every word in file "this is my doc file.doc", then after select "FILENAME" and "UPPERCASE" in the first two combo boxes, you just need to select "the_first_letter_of_each_word" in the 3rd combo box, then the file will be renamed as "This Is My Doc File.doc".
How to convert a picture file into another format*.
Using BatchRename's renaming rule, you can convert a picture file into all the popular formats: BMP, JPG, GIF, TIFF, and PNG, you can also specify the quality if convert to a JPG file.
When selecting "PICCONVERT" from the 1st command combo box, all the supported picture converting formats will be listed on the 2nd combo box, and if selecting JPG on the 2nd combo box, you can specify the quality of JPG in the 3rd and 4th combo box. The quality could be from 1% to 100%.
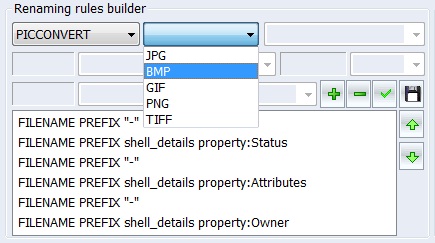
After that, use the "+" button to add the renaming command and start renaming, the picture file in the file list will be converted to the corresponding format.
(*This feature is available in BacthRename Pro only)
How to adjust picture's image property*.
Using BatchRename's renaming rule, you can also change picture's image properties:
- Resize to enlarge or shrink your photos to a specific size.
- Rotate your picture with a specific angle: 90, 180, 270.
- Flip your picture horizontally or vertically.
By selecting "PICADJUST" on the 1st combo box, the "Size", "Rotate", and "Flip" options will be listed on the 2nd combo box.
Then on te 2nd combo box, when selecting "Size", you can specify to resize the picture to a percentage of the original size, or to a specific size, like 1280*800 on the 3rd combo box; if selecting the "Rotate", you can select to rotate it with 90 degree, 180 degree, or 270 degree; by selecting "Flip", you can choose to flip the picture horizontally or vertically on the 3rd combo box.
(*This feature is available in BacthRename Pro only)
Specify the output folder for the renamed files
BatchRename allows your to output the renamed files into a different folder by specifying destination directory using the renaming command "DESTDIR". Just need to select "DESTDIR" on the first combo box in rule builder, then no other options needed, click the "+" button to add the renaming command, a folder dialog will popup to let you select the destination folder, after selecting the folder, a new command will be added to the list, then the files after renaming will be output to that folder.
This renaming command can be combined with other commands, so you can specify the output folder for any renaming result.
Encrypt/Decrypt (Encode/Decode) filenames
When more and more people care about the security of their files on computer, even the file names contain lots of information, so let BatchRename help you to encrypt the names.
You can choose from 3 different algorithms to encrypt/encode your file names:
- RC4 - you can create your own password to encrypt the file names, so it will be very hard for others to decrypt them, create a long password will also increase the security. But using RC4 algorithm will grow the length of the file name, so for very long file names, after encryption, it may exceed the Windows allowed file name max length, then the rename won't succeed. You can truncate file names to a specific length then use RC4 to encrypt them.
- Base64 - It's a popular and fast encoding algorithm, it can help you hide quickly the filenames. But it won't be too hard to decode, and it's not password protected, you can use this together with RC4 method, encode filenames first by Base64 and then encrypt them with RC4, it will be harder to decrypt.
- MD5 - you can use this method to encode a filename, but it won't be decodable.
If you select "ENCRYPT" from the first combo box, "Filename", "FileExtension", and "AllTogether" will be listed on the 2nd combo box, you can select to encrypt/encode the filename only, or the file extension only, or the whole file name and extension together there. After that on the 3rd combo box, RC4, Base64, and MD5 will be the options there, and if you select "RC4", you can input a password for the encryption.
When you select "DECRYPT" from the 1st combo box, the only difference will be there's no "MD5" option on the 3rd combo box, because it's not decodable.
Format the timecode for a batch of FX picture filenames.
How to...
(1)Select "FORMAT" in the first rule combo.
(2)Select one of 5 timecode formats in the second rule combo.
(3)Set the frame per second. It supports 30 frame (NTSC), 25 frame (PAL), and 24 frame (HiDef and Film). You can also define the frame number freely.
(4)Set the initial parameter of the timecode. If you do not set the initial parameter, the timecode will be convert from the filename. For example: In NTSC, Image0060.tga will be changed to Image_00-00-02-00_0060.tga
Preview, Rename and Undo
After files have been added to the file list and a renaming rule is ready by selecting from favorite rules list or created in renaming rules builder, you can start preview the renaming changes by press the  button, or start renaming all the files by press the
  button.
And after you click the "Start Rename" button to change the files, the  button will be enabled, if you don't want to keep the new changes, but restore the old file names, you just need to press this "Undo Rename" button.
Save and Load Batch job feature
The files in the file list, the renaming rule in the rule builder, and even the result list and the undo rename state can all be saved to a file, so with these two buttons:
 you can easily store and reuse the renaming rules, file list, changing state, and rollback to the old filenames by loading the batch file you saved before.
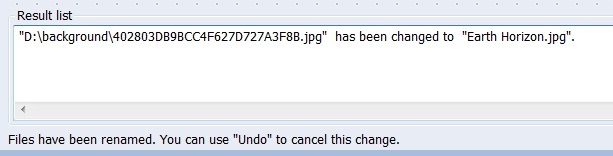
Check the result of the operations
The detail result of preview and renaming files will be displayed in this result box at the bottom of BatchRename window. The result for the undo operation will also be displayed here.
How to activate this product online and unlock the full features
(If you haven't purchased this product yet, please purchase it at http://www.foryoursoft.com/buy.htm, this activation service is only provided for paid users)
1. Please click the "Activate" button (with the icon of keys) on the title bar to show the Activation dialog.

2. Then, please fill in your name, email and most importantly the Order ID (which has been sent to you by email after you complete the online order), and click the "Activate Online" button at bottom to unlock the full verison.

Online update

Click the help menu button on the title bar to show the help menu as follow:
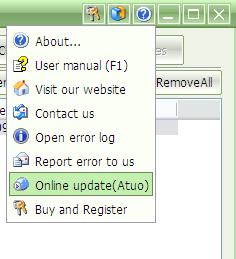
Then click on the "Online update" menu item to check for new version online. It will contact our server to get the latest version and prompt you whether to upgrade to the latest version if available. When there's a "(Auto)" tag at the end of this item, it means "File Property Edit" will automatically check for new version every time when it starts. Click this item again will toggle it to not auto check for new version.
Error log and report
All the errors occurred during your use of "File Property Edit" will be logged in a file. Here's how to view it and report it to us.
Click the help menu button on the title bar to show the help menu as follow:
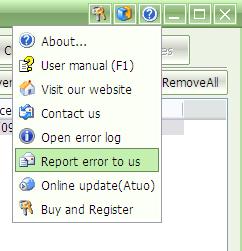
Then, click the "Report error to us" item to send us the error report by email. We will analyze the error report and try to find out the solution for you. You can also view the error log by clicking the "Open error log" item.
Technical support
If you have any questions, comments, or suggestions on our product, please feel free to use our online support system at: http://www.foryoursoft.com/support.htm
Thank you!
